How to Create an HTTP Tweak Config, Add Tweaks and Servers, and Upload It to the Web Panel
A complete written companion to our tutorial: create a configuration in the app, add matching tweaks and servers, export it safely, and import it into the HTTP Tweak Web Panel.
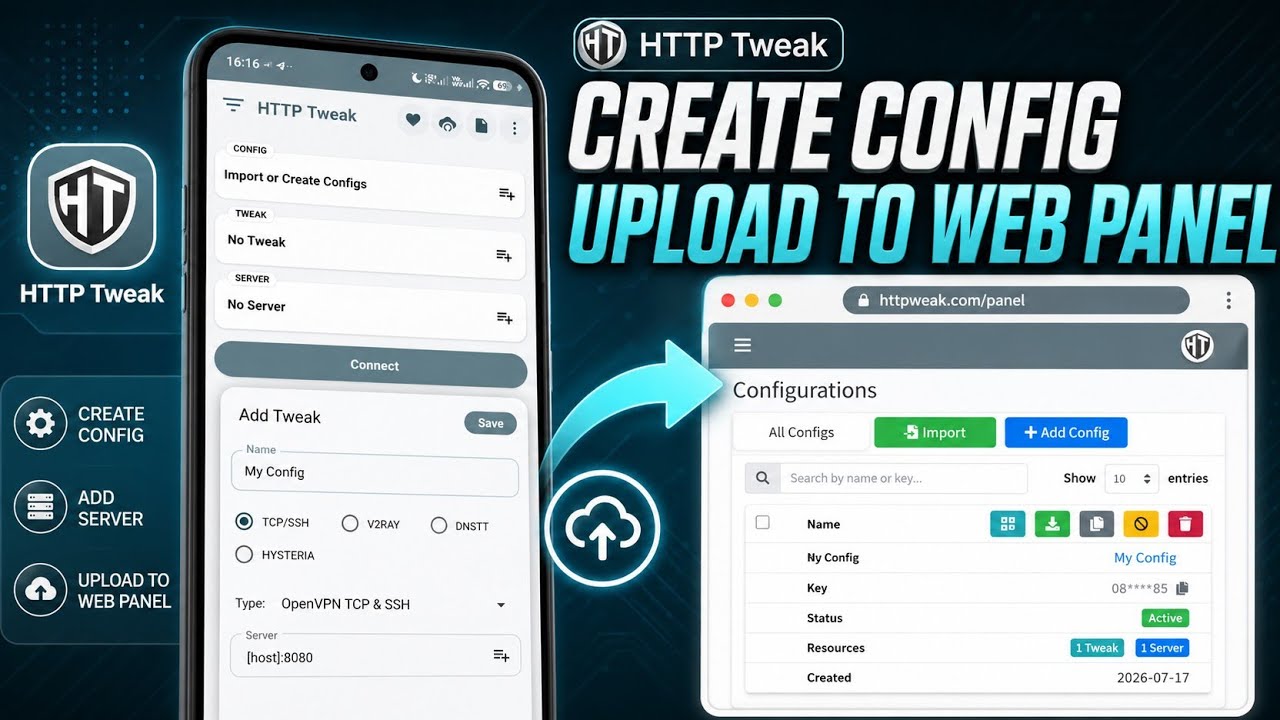
This guide turns our video tutorial into a complete written walkthrough. Follow the steps in order to create a configuration in the HTTP Tweak app, add the connection resources it needs, and bring the finished configuration into the Web Panel for ongoing management.
Watch the companion video at any time: HTTP Tweak: Create a Config, Add Tweaks and Servers, and Upload It to the Web Panel.
Important: A configuration packages settings for the HTTP Tweak client. It does not create a remote SSH, VPN, proxy, or V2Ray account. Start with connection details that you are authorized to use, and never publish real usernames, passwords, private keys, UUIDs, or full private profiles in screenshots or support messages.
What you will create
By the end of this guide, you will have one configuration that contains:
- A clear configuration name.
- At least one tweak, which defines the connection method and transport settings.
- At least one server, which supplies the endpoint or profile used with that tweak.
- An exported configuration that can be imported into the HTTP Tweak Web Panel.
The app is where you build and test the configuration. The Web Panel is where you can later organize it, review its resources, apply configuration controls, and use the supported export and sharing options.
Before you start
Have these ready before opening the app:
- the current HTTP Tweak app installed on your Android device;
- a Web Panel account that you can sign in to;
- authorized server or profile details from your own infrastructure or provider;
- the tunnel type those details require, such as OpenVPN/SSH, V2Ray, DNSTT, or Hysteria;
- the matching transport values, when applicable: a payload, SNI, proxy, resolver, profile link, or other provider-supplied setting.
Do not guess at values simply to complete the form. A saved configuration can be valid in shape while still being unable to connect if the endpoint, account, DNS, firewall, subscription, or transport details are wrong.
Step 1: Create the configuration in HTTP Tweak
- Open HTTP Tweak and go to the configuration selector.
- Choose Import or Create Configs, then choose Create Config.
- Enter a recognizable name, such as
Singapore SSH - July 2026orMy VLESS Test. - Leave optional locks and advanced controls disabled for the first test unless you already know that you need them.
- Tap Save to create the configuration.
The new configuration becomes the active working configuration. The app can create a temporary name automatically when you add a resource first, but naming it now makes it much easier to identify after it reaches the Web Panel.
Optional controls when creating a config
The configuration editor also offers controls such as expiration, password or device locks, application restrictions, update URL settings, and resource-sharing options. These are useful for a finished, tested configuration. For a first build, keep the workflow simple: create the config, add its resources, verify it, then apply only the controls that match your delivery policy.
Step 2: Add a tweak
A tweak tells the app how to use the connection. It is not the server account itself.
- With the new configuration selected, tap Add Tweak.
- Give the tweak a meaningful name, for example
SSH over TLSorVLESS WS. - Select the correct Tunnel family.
- Select the matching subtype and enter only the values supplied for that connection.
- Add a category if you use categories to organize resources.
- Tap Save.
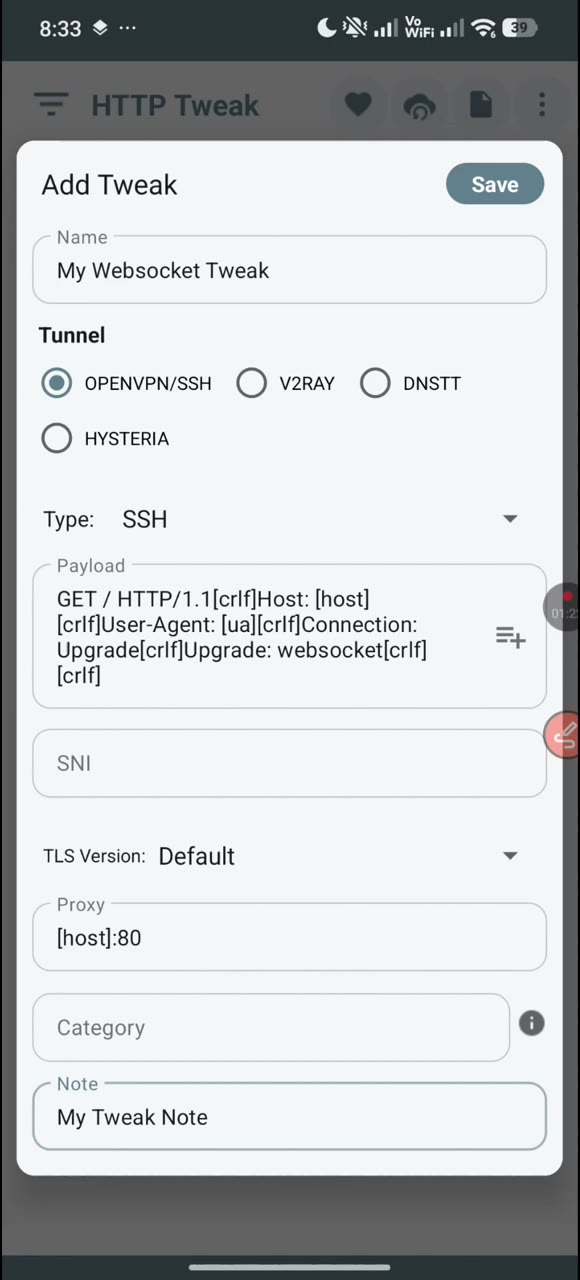
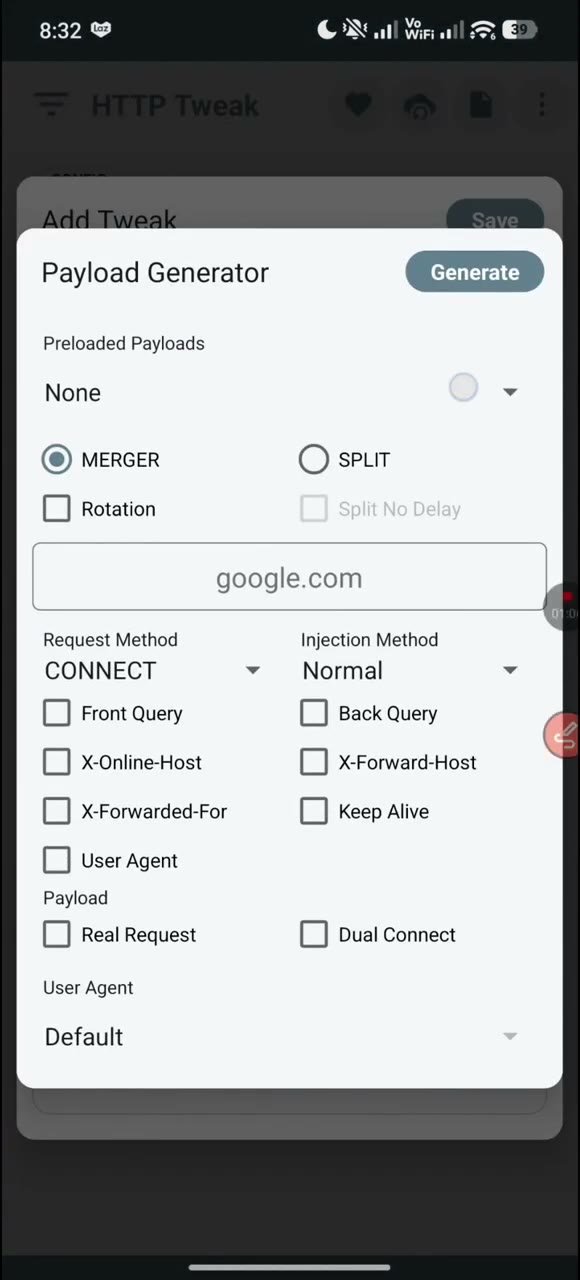
If your connection requires a custom payload, use the payload generator from the tweak form and copy only the values supplied for your authorized setup.
Use the tunnel family that matches the server or profile you will add next:
| Tunnel family | Typical tweak details | Use it when |
|---|---|---|
| OpenVPN/SSH | Type, payload, SNI, TLS version, and proxy when required | Your authorized setup uses OpenVPN or SSH transport settings |
| V2Ray | V2Ray type and optional bug host | Your provider supplied a VLESS, VMess, Trojan, Shadowsocks, Hysteria2, SOCKS, HTTP, or WireGuard-compatible V2Ray profile |
| DNSTT | Resolver and payload | Your authorized setup includes DNSTT resolver information |
| Hysteria | Hysteria-specific selection | Your connection is explicitly configured for Hysteria |
Keep categories consistent
Categories are optional, but they are useful. When a tweak has a category, give the compatible server the same category. The app uses that relationship to show the relevant servers for a selected tweak. A category mismatch can make a valid server appear unavailable.
Step 3: Add a server
The server contains the endpoint or complete profile that the selected tweak will use.
- Tap Add Server.
- Enter a clear server name, such as
SG 01orPrimary VLESS. - Select the same tunnel family as the tweak where they are meant to work together.
- Enter the server or profile data provided for that tunnel type.
- Use the same category as the tweak when you are grouping resources by category.
- Tap Save.
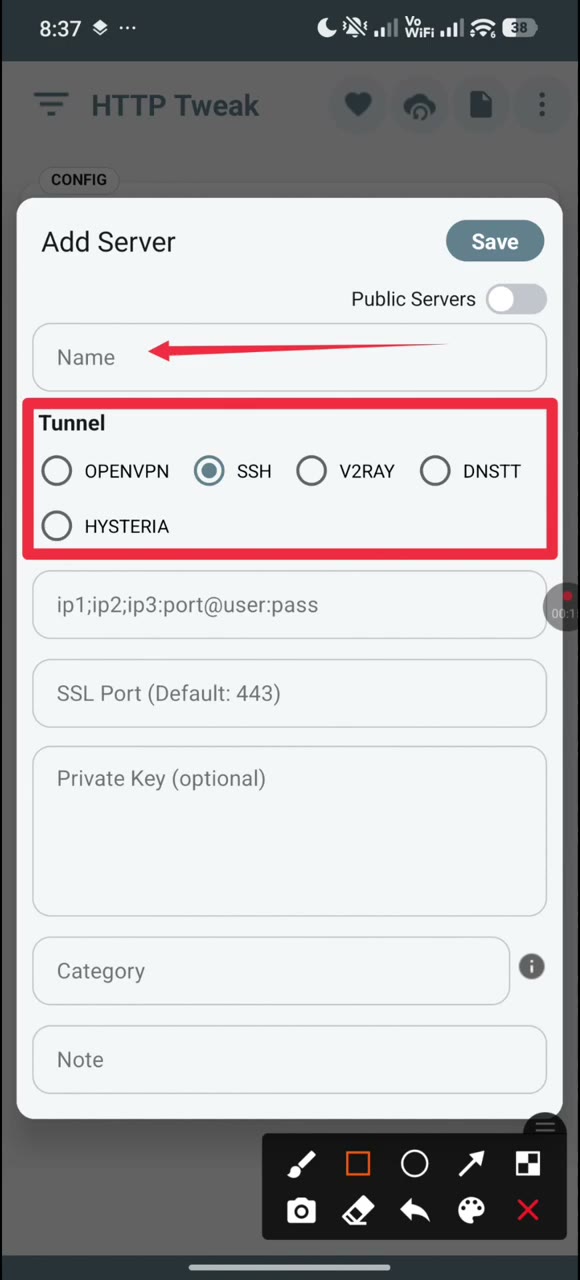
The form changes when you choose a different tunnel family. For example, the video shows the V2Ray server fields after V2Ray is selected.
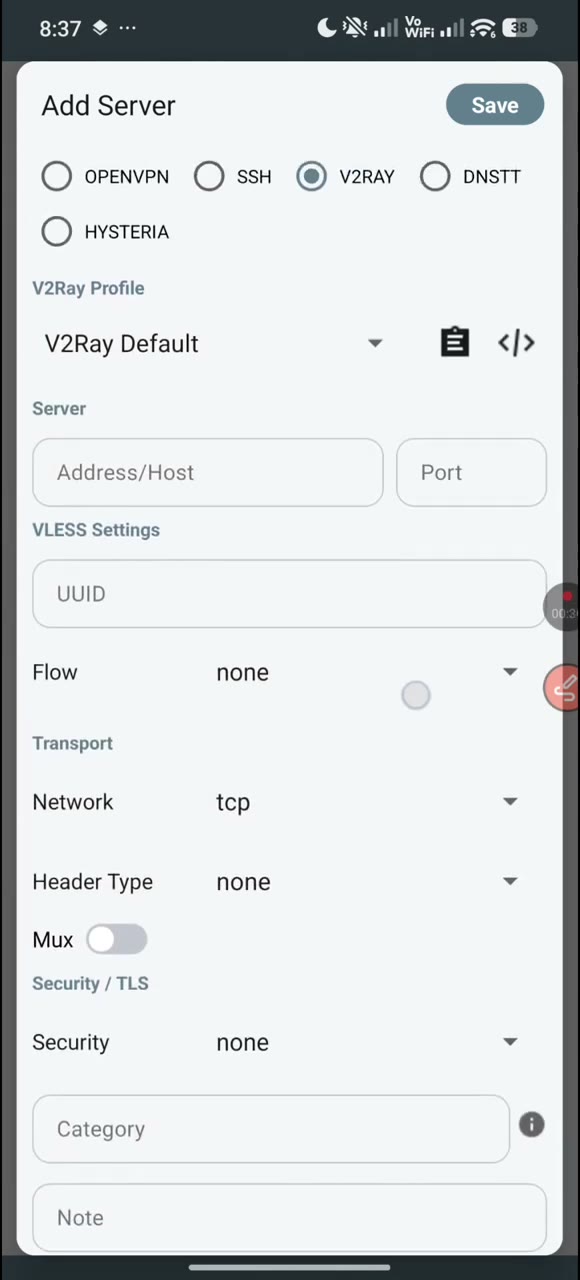
The fields change with the selected tunnel type. Some common examples are:
| Server type | What the app expects | Notes |
|---|---|---|
| OpenVPN | Credentials, SSL port, and an OpenVPN configuration | Use the exact OpenVPN material and port provided for the account |
| SSH | Host or IP, port, username, password, and optional key material | Keep credentials private; replace them when they expire or are rotated |
| V2Ray | A V2Ray profile/share link or the required manual profile fields | Choose the same V2Ray protocol and transport supplied by the provider |
| DNSTT | Name servers, credentials where required, and public-key information | Resolver and key values must match the DNSTT deployment |
| Hysteria | Host, port, authentication, obfuscation, TLS, and bandwidth values as applicable | Use values that the Hysteria server operator explicitly supports |
If the app has a selected tweak already, it can preselect a matching server tunnel type and category. Check the fields before saving; preselection is a convenience, not a replacement for verifying the connection details.
Step 4: Check the configuration before exporting
Before you move to the Web Panel, make sure the configuration has the resources you expect.
- Confirm that at least one tweak is listed.
- Confirm that at least one server is listed.
- Select the tweak and make sure the intended server is available.
- If the server is missing, compare the tunnel types and categories first.
- Test only with an account and endpoint you are authorized to use.
A successful save only means the app accepted the fields. A successful import only means the package can be read. A working connection still depends on the remote service, account validity, network path, DNS, firewall rules, and compatible client settings.
Step 5: Export the finished configuration from the app
- Open the configuration’s export options in HTTP Tweak.
- Choose Export Config.
- For the Web Panel file-import path, choose the option that saves the configuration as an
.htfile. - Store the file somewhere you can locate from the browser you use for the Web Panel.
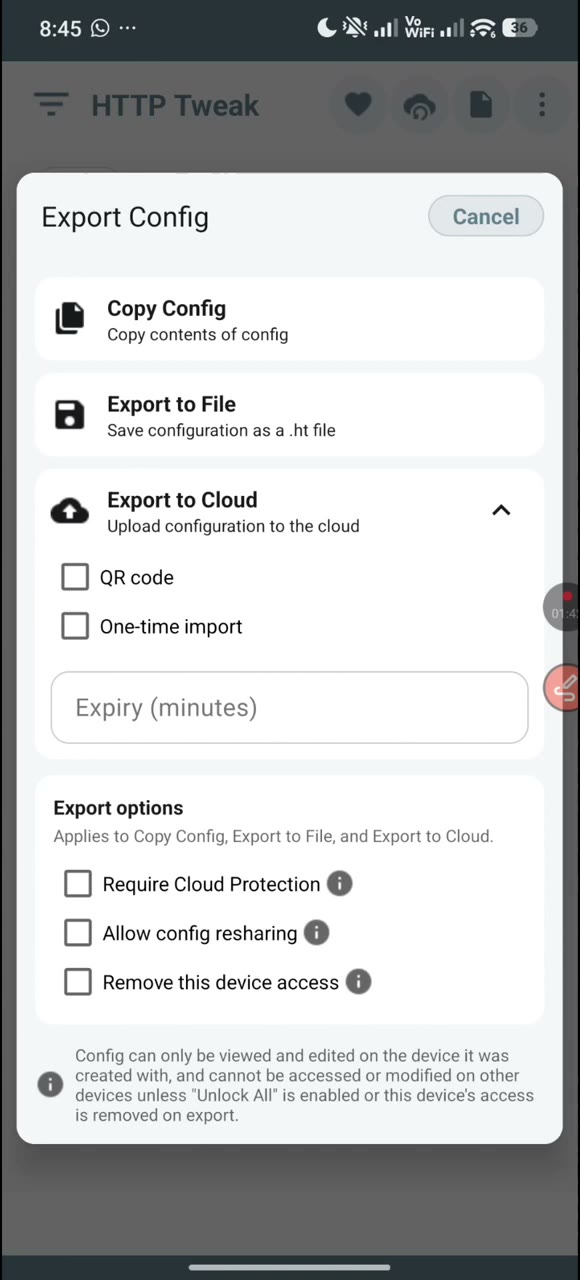
The export dialog may also offer copy, cloud, QR, sharing, or protection options. Those are useful in their respective workflows, but the .ht file is the clearest option for this tutorial because it maps directly to the Panel’s file-import option.
Treat an exported configuration as sensitive. It can contain access material. Do not upload it to public file hosts, post it in group chats, or attach it to a support request unless you have removed or replaced all private values.
Step 6: Import the configuration into the Web Panel
- Sign in to the HTTP Tweak Web Panel.
- Open Configurations.
- Click Import.
- Select Upload Config and choose the exported
.htfile. - Click Import and wait for the confirmation message.
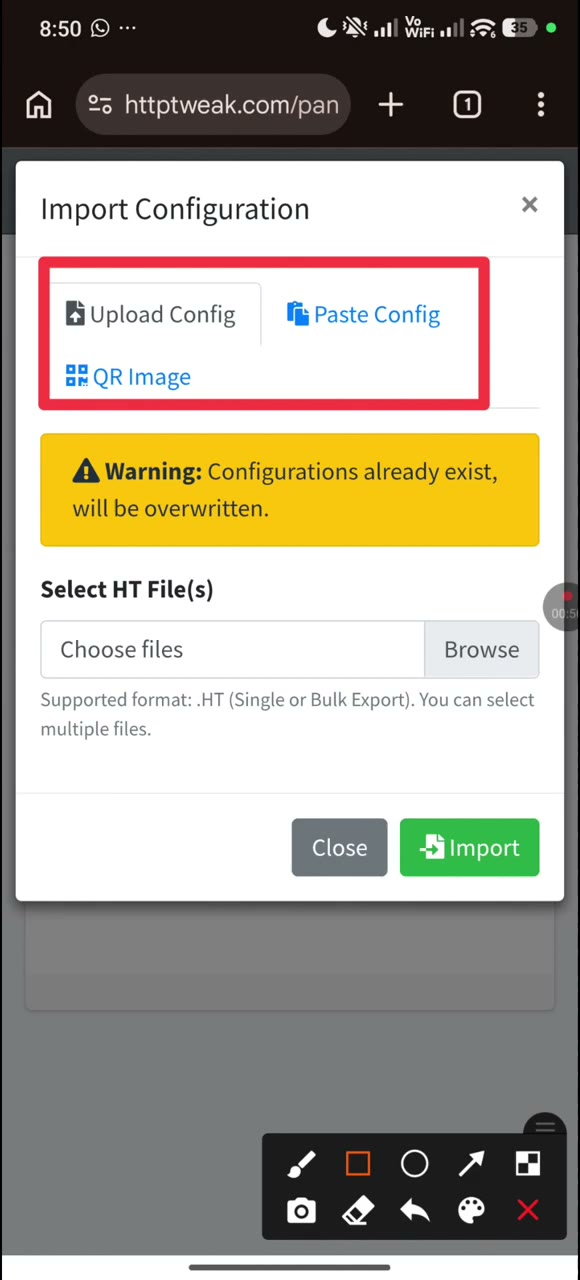
The same import dialog also supports Paste Config Content and Scan QR Image. Use those only when you deliberately exported or received the configuration in that format. For the app-to-panel workflow in this guide, upload the .ht file you just exported.
After a successful import, open the configuration from the list and confirm that its name, server count, and tweak count look right. If a resource is missing, return to the app copy, correct it there, export again, and import the corrected package instead of trying to reconstruct private details from memory.
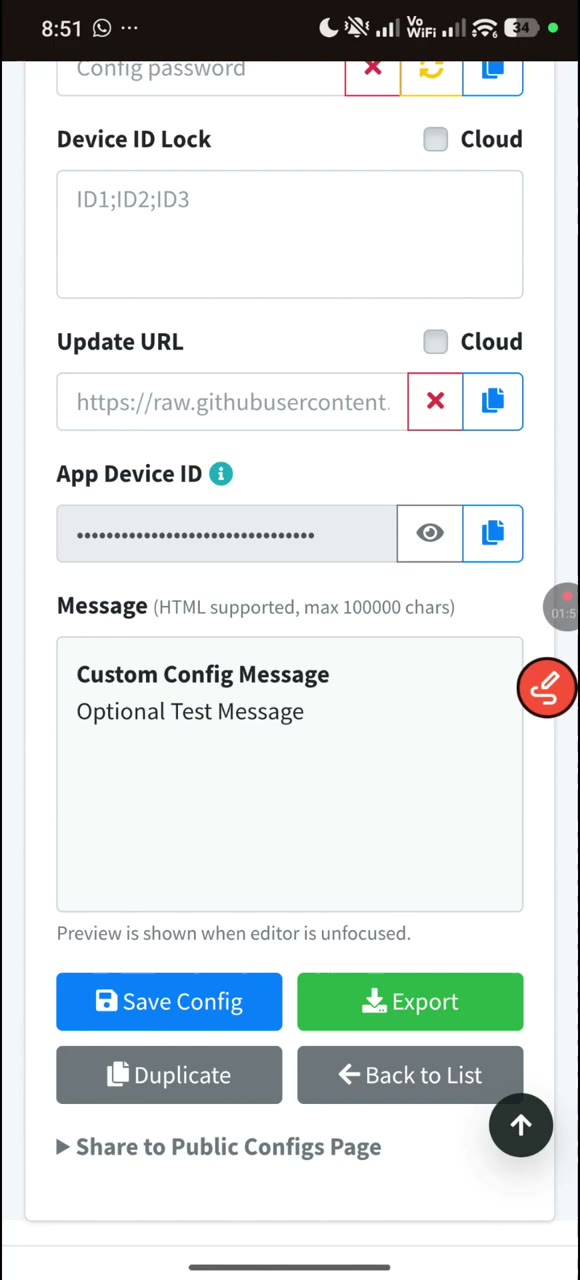
Step 7: Manage the configuration safely in the Panel
Once imported, the configuration page is the right place to review and maintain the configuration over time. Depending on your needs, you can:
- rename the configuration so its purpose and revision are obvious;
- review its saved tweaks and servers;
- set a message, expiration, password, device, or application controls only after testing;
- export or share it through the approved Panel options;
- replace the configuration when its upstream endpoint or credentials change.
The Panel does not provision remote accounts or make an invalid endpoint work. If an SSH login, VPN subscription, or V2Ray credential fails, correct that with the authorized provider or your own infrastructure first, then update the configuration package.
Troubleshooting
The app says “Add tweak first” or “Add server first”
The configuration is incomplete. Add at least one tweak and one server before expecting the connection selector to have a usable pair.
My server does not appear for the selected tweak
Check that both resources use compatible tunnel types. If you assigned categories, check that the category names match exactly. Remove the category from both resources only if you do not need category-based filtering.
The Web Panel cannot import my file
Make sure you selected the actual .ht export rather than an unrelated download or screenshot. Re-export the configuration from the app, then try the Panel’s Upload Config option again. Do not edit encrypted configuration content manually.
The configuration imports but does not connect
Importing is not a connection test. Recheck the endpoint, port, account status, credentials, transport type, payload/SNI/proxy values, DNS, and provider-side restrictions. Avoid repeatedly changing unrelated fields; change one verified value at a time so you can identify the cause.
Video companion
Prefer the visual walkthrough? Watch Create a Config, Add Tweaks and Servers, and Upload It to the Web Panel on YouTube, then use this page as your checklist while you follow along.
Frequently asked questions
Does uploading a configuration create an SSH or VPN account?
No. Uploading packages the configuration for HTTP Tweak management. The remote account and service must already be provided by your authorized infrastructure or provider.
Do I need to add the tweak before the server?
That is the easiest sequence because the app can use the selected tweak to prefill a compatible server tunnel type and category. What matters is that the saved tweak and server are compatible before you test or export.
Can I use a config key, copied content, or QR image instead of an .ht file?
Yes, when the content was deliberately exported in that supported form. The Panel import dialog supports file upload, pasted configuration content, and QR-image scanning. This guide uses .ht export because it is easiest to verify step by step.
Should I add locks before uploading to the Panel?
Usually, test the basic configuration first. Apply expiration, password, device, application, and sharing controls after you know the authorized connection works and you understand the policy you want to enforce.